


- Posts: 10114
- Thank you received: 476


Oh, you just died earlier than usual, then...


 I didn't go to bed early, in fact I was probably up later than I normally am last night
seems everyone went to bed early yesterday... 
Almost 
The shoutbox is unavailable to non-members
Shoutbox History
Oh, you just died earlier than usual, then...
I didn't go to bed early, in fact I was probably up later than I normally am last night
seems everyone went to bed early yesterday...
Almost
Crankshaft's Sketchbook
25 Feb 2016 00:31 - 25 Feb 2016 00:38 #13408
by Valence
Replied by Valence on topic Crankshaft's Sketchbook
I don't think the pic is too over-detailed, but that opinion is no more or less valid than any other. The only "design" issue that may look a bit off is the object above the nearest leg (where the two cables connect.) Its shape looks a little different from the straight lines elsewhere and it disrupts the top edge of the leg which helps to describe the form.
It's true that the structure of the back of the mech is a bit unclear at the moment but that's just because this is a wip and the shading is currently flat. Once you start rendering a bit more and get a bit of specularity/reflection, occlusion (and cast) shadows and also a bit of texture then it'll all become a bit clearer. (I had a bit of a doodle-over and I think it'll look fine.)
It may be the lack of texture that's causing you to worry about extra detail. When a picture is at this intermediate stage with flat shading and a small value range it can often look a bit plain and you can get the urge to change the geometry to add visual interest.
With all art the best thing is to not worry too much, just be patient with yourself and your ideas, have confidence in those ideas without trying to second-guess what this or that person will think and just work it through. By far the best thing about digital work is the ability to go back and change what you've done and to try new things without the pitfall of ruining your hard work. So take advantage of that!
Last edit: 25 Feb 2016 00:38 by Valence.
Please Log in or Create an account to join the conversation.
26 Feb 2016 20:43 #13419
by Banj
Replied by Banj on topic Crankshaft's Sketchbook
I don't believe you have too much detail, but more a lack of clarity in defining the various forms of the machine. If you look at those 3 examples you posted they have a clear and immediate read of the design, whereas your image takes longer to work out what is what.
I just ran all of those images and your own through Photoshop's cutout filter and you can see that mostly, the other 3 are still clearly readable, while yours loses it's legs and becomes a little confusing round the back end.
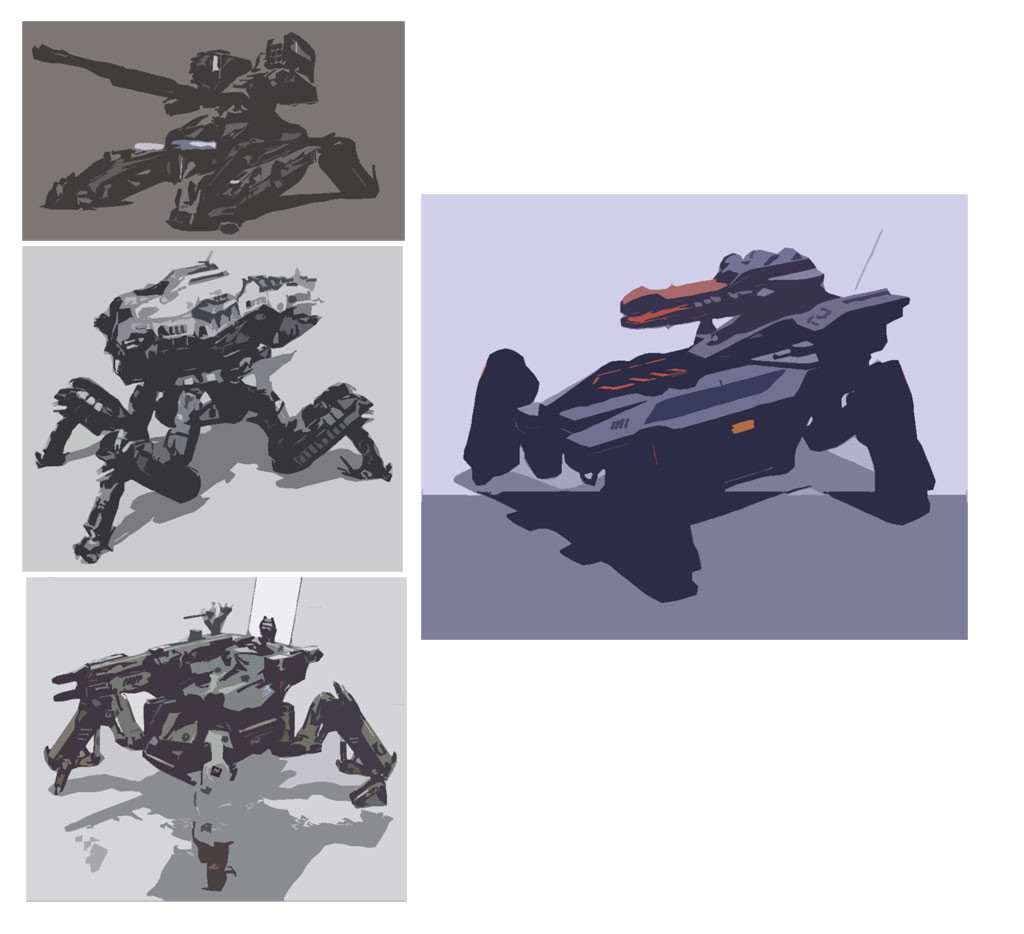
It's mostly a matter of separation through value I would say.
I just ran all of those images and your own through Photoshop's cutout filter and you can see that mostly, the other 3 are still clearly readable, while yours loses it's legs and becomes a little confusing round the back end.
It's mostly a matter of separation through value I would say.
Please Log in or Create an account to join the conversation.

26 Feb 2016 21:16 #13420
by Atto
No smudge tool was harmed in the making of this image.
Replied by Atto on topic Crankshaft's Sketchbook
Wow! Thats a very cool way of looking at it. I think Banj has once again hit the nail on the head Crank.
No smudge tool was harmed in the making of this image.
Please Log in or Create an account to join the conversation.
- crankshaft
-
 Topic Author
- Offline
- Platinum Member
-

Less
More
- Posts: 1450
- Thank you received: 55
27 Feb 2016 04:05 #13426
by crankshaft
Replied by crankshaft on topic Crankshaft's Sketchbook
Thanks everyone for the feedback!
@Atto Yup Banji definitely nailed that one. Definitely agree with your post on critique. I sometimes check out art on deviant art and the feedback is all over the place...A lot of people simply don't take growth seriously.
@Banji Wow thanks a lot ! That makes so much sense. Didn't even see the leg disappearing like that (fail on my part).
@Valence Thanks for the advice! Along with the back I realized there are actually more problems with it.
So I've made the painful decision to redo the entire mech. It's probably the best way to learn. Looking back at my sketches I've realized that I subdivided my forms too much. I have so many steps or shapes within shapes or too much overlapping. I was really looking forward to finishing something since my sb is nothing but iterations and studies. I guess when you're learning the journey is more important than the destination.
I also realized the mech is plagued with problems. The legs are too stiff. The gun on the turret looks like it can fall off. The guns have limited movement etc.
Fortunately this has led to more opportunities. I'm going to post design sketches from my sb (or digital revisions). They'll be design heavy with little fundamentals. That way they'll be open for critique to prevent bad habits from happening ie the mech. My initial intention was to keep them hidden then flesh them out slowly and completely but it would take forever. Plus with this new method I can always go back and pick which one to flesh out.
And schoolism wip.
Please Log in or Create an account to join the conversation.
- crankshaft
-
Topic Author
- Offline
- Platinum Member
-
Less
More
- Posts: 1450
- Thank you received: 55
29 Feb 2016 02:42 #13434
by crankshaft
Replied by crankshaft on topic Crankshaft's Sketchbook
Updates.
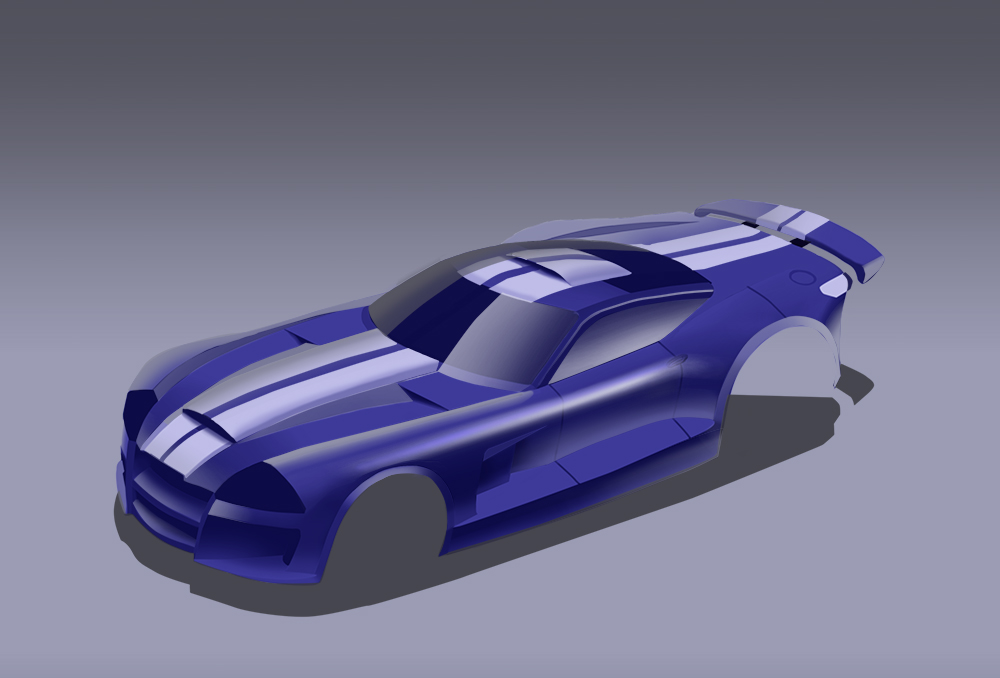
Car rendering updates. These two have brighter reflections.

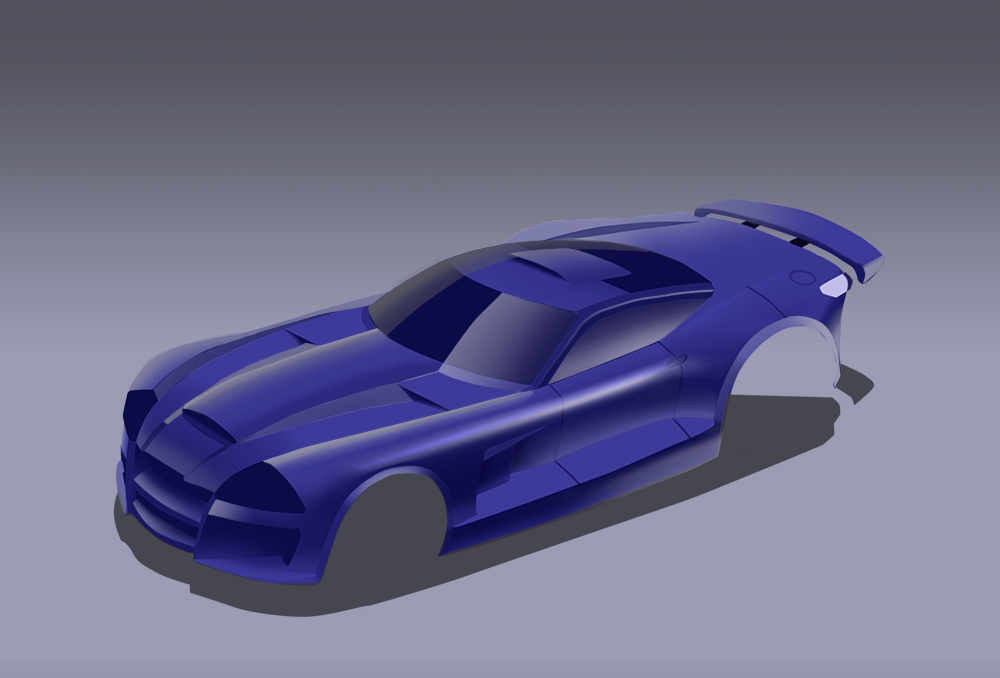
This one has less brighter reflections.
Car rendering updates. These two have brighter reflections.
This one has less brighter reflections.
Please Log in or Create an account to join the conversation.
- cgmythology
-

- Offline
- Senior Member
-

29 Feb 2016 19:39 #13436
by cgmythology
Replied by cgmythology on topic Crankshaft's Sketchbook
Very nice updates, the car design is coming out very slick, love the rendering of the material!
Please Log in or Create an account to join the conversation.
01 Mar 2016 13:41 #13452
by Banj
The simplest way to check values while you are painting is to add a new layer at the top of your stack filled with black and set to colour blending mode. Then just toggle its visibility on every so often to see your image in black and white. Maybe zoom out as well and check how it reads at a small thumbnail size.
Replied by Banj on topic Crankshaft's Sketchbook
@Banji Wow thanks a lot ! That makes so much sense. Didn't even see the leg disappearing like that (fail on my part).
The simplest way to check values while you are painting is to add a new layer at the top of your stack filled with black and set to colour blending mode. Then just toggle its visibility on every so often to see your image in black and white. Maybe zoom out as well and check how it reads at a small thumbnail size.
Please Log in or Create an account to join the conversation.
- crankshaft
-
Topic Author
- Offline
- Platinum Member
-
Less
More
- Posts: 1450
- Thank you received: 55
01 Mar 2016 23:19 #13457
by crankshaft
Replied by crankshaft on topic Crankshaft's Sketchbook
Thanks Cg! Still much to learn.
Thanks Banji! Question for you: I actually thought to check values you should use a hue/saturation layer on top then only tone the saturation down to zero? Maybe that's why my values are so messed up!
Thanks Banji! Question for you: I actually thought to check values you should use a hue/saturation layer on top then only tone the saturation down to zero? Maybe that's why my values are so messed up!
Please Log in or Create an account to join the conversation.
03 Mar 2016 13:14 #13459
by Banj
A black colour mode layer doesn't alter the values below it, I just tested the method you are using with a H/S adjustment layer to see and the values shifted slightly.
You can test this yourself by creating a simple image with a stepped gradient of black to white (or just paint some blobs on a canvas of varying greyscale values, then put a black colour mode layer on top. Colour pick the different areas and check the values you get with and without the layer on, the values should be the same. If you replace the black colour layer with a H/S adjustment layer, you will get different readings from the original and the adjusted version. Not a massive difference (although I can visually see the change when I flip the adjustment layers visibility on and off), but the values are being altered.
Replied by Banj on topic Crankshaft's Sketchbook
Thanks Banji! Question for you: I actually thought to check values you should use a hue/saturation layer on top then only tone the saturation down to zero? Maybe that's why my values are so messed up!
A black colour mode layer doesn't alter the values below it, I just tested the method you are using with a H/S adjustment layer to see and the values shifted slightly.
You can test this yourself by creating a simple image with a stepped gradient of black to white (or just paint some blobs on a canvas of varying greyscale values, then put a black colour mode layer on top. Colour pick the different areas and check the values you get with and without the layer on, the values should be the same. If you replace the black colour layer with a H/S adjustment layer, you will get different readings from the original and the adjusted version. Not a massive difference (although I can visually see the change when I flip the adjustment layers visibility on and off), but the values are being altered.
Please Log in or Create an account to join the conversation.
- crankshaft
-
Topic Author
- Offline
- Platinum Member
-
Less
More
- Posts: 1450
- Thank you received: 55
05 Mar 2016 19:50 #13470
by crankshaft
Replied by crankshaft on topic Crankshaft's Sketchbook
Thanks Banji! I've learned so much about values now! I was so lost and confused but now I get everything.
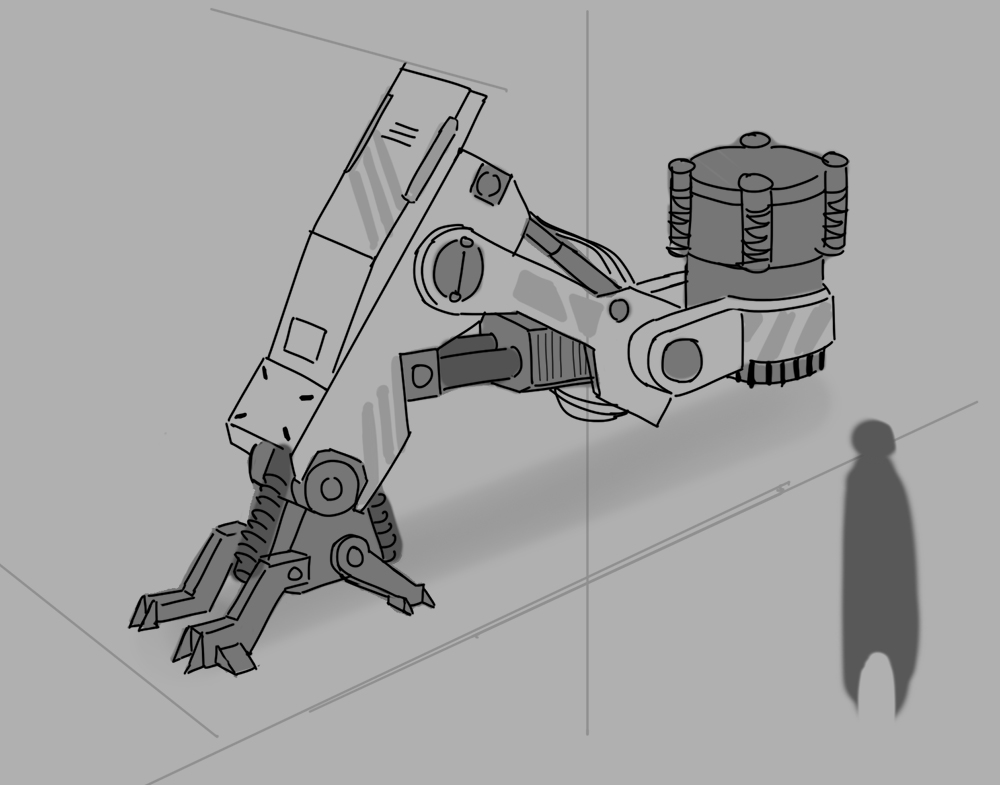
Mech wip update. Re did the leg, realized it was too busy and had poor weight balance. Proportions were not clear as well. Also the foot was too busy. This new version has self aligning feet and is simpler in design.
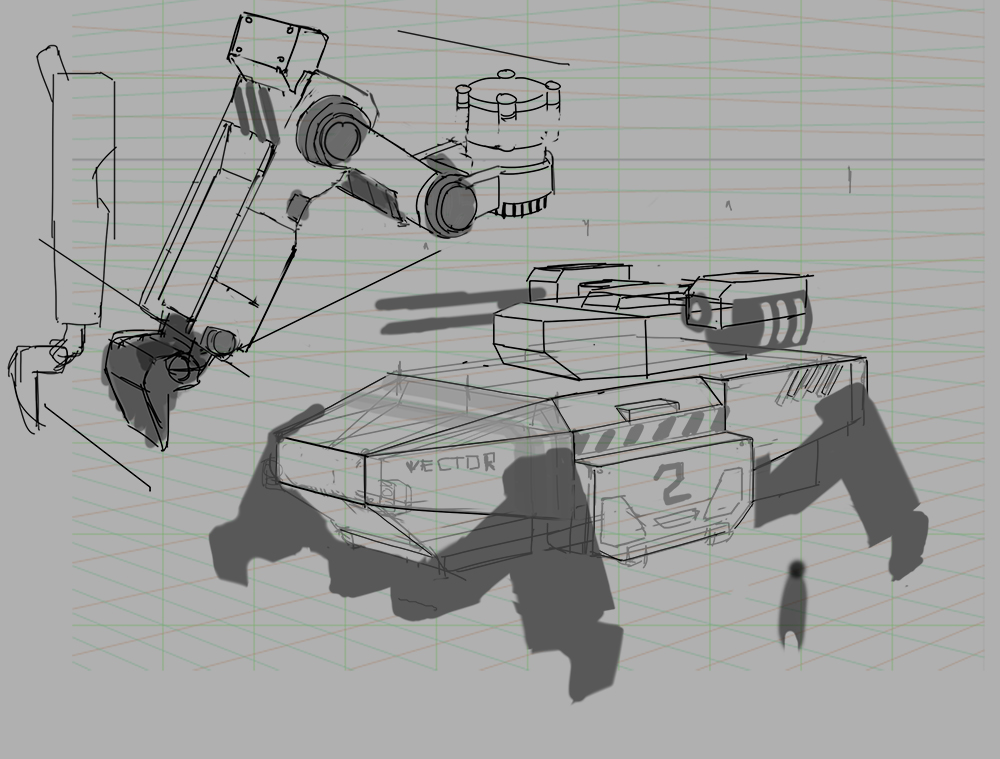
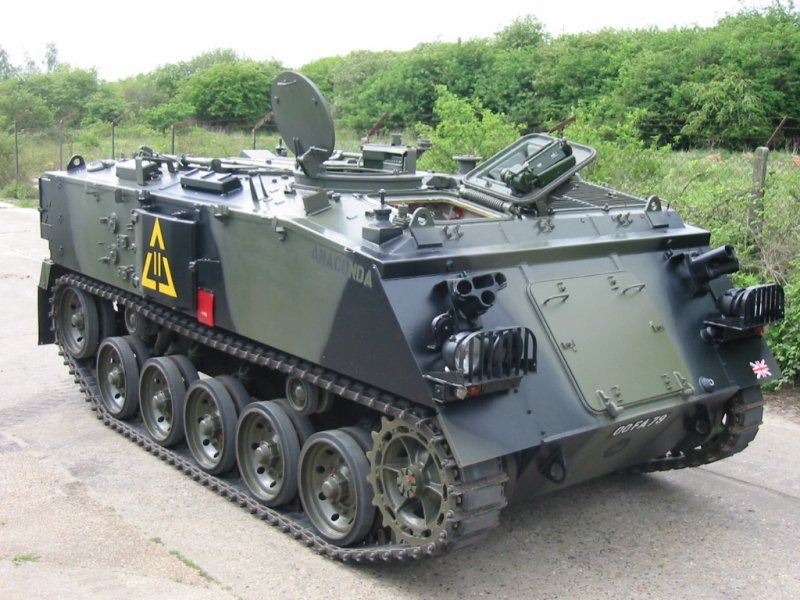
Going to base the mech off an APC, armoured personnel carrier.

Mech wip update. Re did the leg, realized it was too busy and had poor weight balance. Proportions were not clear as well. Also the foot was too busy. This new version has self aligning feet and is simpler in design.
Going to base the mech off an APC, armoured personnel carrier.
Please Log in or Create an account to join the conversation.
Latest Activity

Banj updated their profile picture


Charlotte Still wearing a mask? Is it so we won't see you hoarding food in those cheeks of yours?
See More
Banj Mfmuh Guhmfpf
See More
Charlotte I'll take that as a yes...
See More
Charlotte Why is there a tiny flashing thing in front of the reply link/button? It's so small I can't see if it's an exclamation mark or a question mark... or...both?)
See More
Banj Because? Both!
See More
Charlotte *gasp*
See More

CaptainDeth updated their profile picture

CaptainDeth Ahoy folks, just a newbie here, just getting started. Thanks for allowing me in.
CaptainDeth Thank You
CaptainDeth and Mr.Bungle joined the site


honbasic joined the site


Gawk joined the site