


 I don't remember exactly
 Oh where was the Bahari pile? N or S?
- Posts: 1256
- Thank you received: 96


The shoutbox is unavailable to non-members
Shoutbox History
 Taylin had already left the building. Well, maybe later. Enough Palia for now.
15 minutes ago
I guess I'll just be all over the place anyway. Was planning to just get that and then go to elderwoods but... I'm already sidetracked.
47 minutes ago
Important, change your password!
Go here for further information: https://cgartnexus.com/index.php/forum/announcements/840-hacked
Someone's gotta start this ball a-rolling!!
30 Jan 2015 22:14 #8582
by Domtopia
Everything's on the right!!!
It's like driving abroad!
Replied by Domtopia on topic Someone's gotta start this ball a-rolling!!
Everyone's a comedian!!
Everything's on the right!!!
It's like driving abroad!
Please Log in or Create an account to join the conversation.
- Digital Dave
-
- Offline
- Platinum Member
-

Less
More
- Posts: 2247
- Thank you received: 163
30 Jan 2015 23:06 #8588
by Digital Dave

I get sketchy around pencils! ...
Replied by Digital Dave on topic Someone's gotta start this ball a-rolling!!
I get sketchy around pencils! ...
Please Log in or Create an account to join the conversation.
31 Jan 2015 01:59 #8594
by Valence
Replied by Valence on topic Someone's gotta start this ball a-rolling!!
<Watches this space and waits to learn all those hair-painting tricks>
Please Log in or Create an account to join the conversation.

31 Jan 2015 11:00 #8599
by Charlotte
Any an all misspellings are henceforth blamed on the cats.
Replied by Charlotte on topic Someone's gotta start this ball a-rolling!!
Thanks for posting the ref Dom. She does have somewhat unusual features (and I think I recognise her though I can't remember where from...) Still, you did elongate her head so that the eye is slightly higher than hers and the forehead is even more offset. (And the ear is closer to the face and higher.) This together with her not yet having hair is probably the reson her face looks rather "pinched" at the top (mostly affecting the eyes). Also you made the neck slightly shorter which may further emphasize the extra length to the forehead. (I just overlaid the two images to compare proportions.)
I think I'd pull the eye and forehead down some, myself, but I am looking forward to seeing your progress. And as Valence I'd love to see your hair painting process step by step!
I think I'd pull the eye and forehead down some, myself, but I am looking forward to seeing your progress. And as Valence I'd love to see your hair painting process step by step!
Any an all misspellings are henceforth blamed on the cats.
Please Log in or Create an account to join the conversation.
31 Jan 2015 12:35 #8601
by Valence
Replied by Valence on topic Someone's gotta start this ball a-rolling!!
Looks like the lovely Emmanuelle Beart. There are worse things to stare at while painting.
Please Log in or Create an account to join the conversation.
31 Jan 2015 12:56 - 31 Jan 2015 14:38 #8604
by Domtopia
Everything's on the right!!!
It's like driving abroad!
Replied by Domtopia on topic Someone's gotta start this ball a-rolling!!
Thanks for the tips and feedback guys!
I don't know who the image is of, I just typed in "Portrait profiles" into Google and these were some of the images that cropped up!
Because the character is a somewhat aloof, but also bonkers! I wanted someone who looked wound tight and also condescending. I really don't mind if the face isn't quite right just yet, I just want a face to paint hair onto!! In fact, as a point of practice I like to try and paint a character from a reference that is orientated the opposite way to my painting. So if my image is flipped to face the right, I will flip the reference image to the left. It was a principle I picked up from a wonderful anatomy book I read where the reader was encouraged to practice drawing a skull (from life if you had one) that was set up upside down, but draw it the right way up. It is pretty tricky!!
She does have a strangely long face though, doesn't she Charlotte! That's a quirky thing that made me chose this face.
I will get to the hair as soon as I can. I am looking forward to it! Thanks for the encouragement both of you!!
I don't know who the image is of, I just typed in "Portrait profiles" into Google and these were some of the images that cropped up!
Because the character is a somewhat aloof, but also bonkers! I wanted someone who looked wound tight and also condescending. I really don't mind if the face isn't quite right just yet, I just want a face to paint hair onto!! In fact, as a point of practice I like to try and paint a character from a reference that is orientated the opposite way to my painting. So if my image is flipped to face the right, I will flip the reference image to the left. It was a principle I picked up from a wonderful anatomy book I read where the reader was encouraged to practice drawing a skull (from life if you had one) that was set up upside down, but draw it the right way up. It is pretty tricky!!
She does have a strangely long face though, doesn't she Charlotte! That's a quirky thing that made me chose this face.
I will get to the hair as soon as I can. I am looking forward to it! Thanks for the encouragement both of you!!
Everything's on the right!!!
It's like driving abroad!
Last edit: 31 Jan 2015 14:38 by Domtopia.
Please Log in or Create an account to join the conversation.
31 Jan 2015 18:35 #8611
by Domtopia
Everything's on the right!!!
It's like driving abroad!
Replied by Domtopia on topic Someone's gotta start this ball a-rolling!!
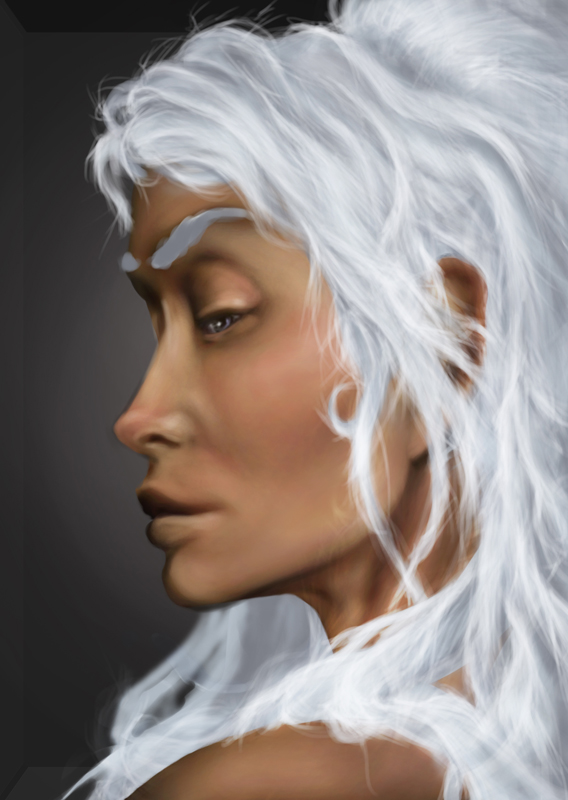
OK, here's my latest WIP. I have been having fun with the hair!
Everything's on the right!!!
It's like driving abroad!
Please Log in or Create an account to join the conversation.
31 Jan 2015 19:21 - 31 Jan 2015 19:22 #8612
by Domtopia
Everything's on the right!!!
It's like driving abroad!
Replied by Domtopia on topic Someone's gotta start this ball a-rolling!!
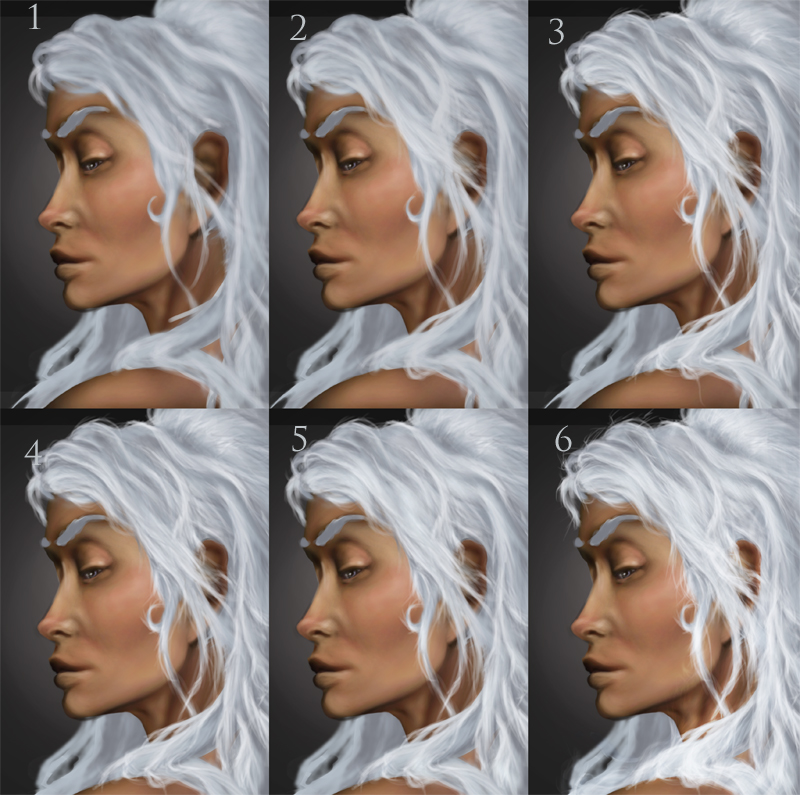
Here's what I did up to now.
1: First step is I got myself a good reference image (or two, as in this case). Then, using a soft brush, I painted in the basic shadows (100% opacity) and highlights (between 50 and 70%). I like to start with the darkest colour in my pallet first.
2: Still using a soft brush I build up a little higher through the values (35-50% opacity) and try to make some interesting shapes. I use the reference quite a lot for this, picking areas I like the look of.
3: Switching to a hard edged brush (standard round in PS) I pick a high value colour and start to pick out the edges. The method I use is to start with a big brush at a low opacity and then to work down in brush sizes and up in opacity. I start at about 20% opacity. I want to keep to the same basic shapes that I made in the first two stages and not get too messy with the strands of hair. This helps me to highlight the volume that is making up the shapes in the hair.
4: A very important thing I try to remember is to work back into the hair with the dark shadow colour I started with. I keep the opacity at 20, but change the colour from a highlight to the shadow colour and then work under edges that I made in step 3. At this stage I like to get a bit more messy and let my brush cross the shapes I made in step 2 and criss cross the rest of the hair.
5: Another thing I tried to remember was the flow and form of the hair. So I went back over it with a soft brush and re-highlighted the contours. By painting broad lateral bands I think it unifies the hair and stops it looking like painted plastic!
6: I then go bonkers with a small brush (but not 1 pixel if I can help it! Usually 5 pixels is small enough) and a high opacity (40%) and scribble all over it! I love to add loose strands and imperfections at this stage. Then I used a trick! I copy a section of the hair that I am currently happy with, copy it, flip it, place it over some other part of the hair and turn it until I like the way it looks, set the layer to overlay (or screen, if I want a highlight) and then using a soft eraser I blend it into the image.
Each stage inly takes a few minutes. This is the method I use most of the time. I think it works better with curly hair than with straight too.
Hope my explanation was understandable!
1: First step is I got myself a good reference image (or two, as in this case). Then, using a soft brush, I painted in the basic shadows (100% opacity) and highlights (between 50 and 70%). I like to start with the darkest colour in my pallet first.
2: Still using a soft brush I build up a little higher through the values (35-50% opacity) and try to make some interesting shapes. I use the reference quite a lot for this, picking areas I like the look of.
3: Switching to a hard edged brush (standard round in PS) I pick a high value colour and start to pick out the edges. The method I use is to start with a big brush at a low opacity and then to work down in brush sizes and up in opacity. I start at about 20% opacity. I want to keep to the same basic shapes that I made in the first two stages and not get too messy with the strands of hair. This helps me to highlight the volume that is making up the shapes in the hair.
4: A very important thing I try to remember is to work back into the hair with the dark shadow colour I started with. I keep the opacity at 20, but change the colour from a highlight to the shadow colour and then work under edges that I made in step 3. At this stage I like to get a bit more messy and let my brush cross the shapes I made in step 2 and criss cross the rest of the hair.
5: Another thing I tried to remember was the flow and form of the hair. So I went back over it with a soft brush and re-highlighted the contours. By painting broad lateral bands I think it unifies the hair and stops it looking like painted plastic!
6: I then go bonkers with a small brush (but not 1 pixel if I can help it! Usually 5 pixels is small enough) and a high opacity (40%) and scribble all over it! I love to add loose strands and imperfections at this stage. Then I used a trick! I copy a section of the hair that I am currently happy with, copy it, flip it, place it over some other part of the hair and turn it until I like the way it looks, set the layer to overlay (or screen, if I want a highlight) and then using a soft eraser I blend it into the image.
Each stage inly takes a few minutes. This is the method I use most of the time. I think it works better with curly hair than with straight too.
Hope my explanation was understandable!
Everything's on the right!!!
It's like driving abroad!
Last edit: 31 Jan 2015 19:22 by Domtopia.
Please Log in or Create an account to join the conversation.
31 Jan 2015 20:34 - 01 Feb 2015 16:56 #8615
by Valence
Replied by Valence on topic Someone's gotta start this ball a-rolling!!
Question: What pen pressure settings do you use for your brushes?
I like the way it has the soft texture of hair, all fluffy and touchable. Mine always looks like fibreoptic wires!
I like the way it has the soft texture of hair, all fluffy and touchable. Mine always looks like fibreoptic wires!
Last edit: 01 Feb 2015 16:56 by Valence. Reason: typo edito
Please Log in or Create an account to join the conversation.
31 Jan 2015 20:48 - 31 Jan 2015 20:50 #8616
by Domtopia
Everything's on the right!!!
It's like driving abroad!
Replied by Domtopia on topic Someone's gotta start this ball a-rolling!!
I only use Photoshop elements 9, so there are no pen pressure settings. It says that I control the size through the pen, but that's it!
I have no custom brushes either, I have yet to figure out what that's all about! So, I just pick the pre-set brushes and use those. Standard round and standard soft are the only two I used.
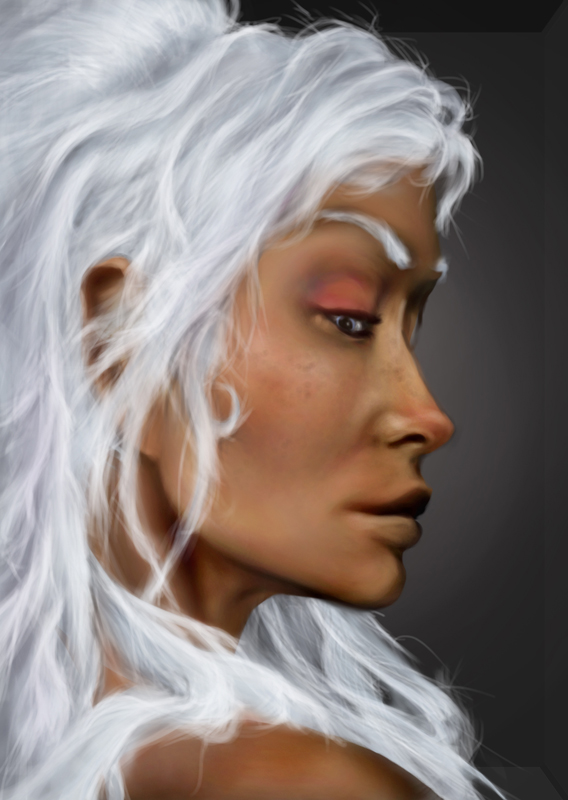
I played around a little more with the hair and tried on some make up (I mean painted it on to her, not tried it on myself!). Plus, I lowered her eyelid a bit and added some freckles, because they're adorable!
I have no custom brushes either, I have yet to figure out what that's all about! So, I just pick the pre-set brushes and use those. Standard round and standard soft are the only two I used.
I played around a little more with the hair and tried on some make up (I mean painted it on to her, not tried it on myself!). Plus, I lowered her eyelid a bit and added some freckles, because they're adorable!
Everything's on the right!!!
It's like driving abroad!
Last edit: 31 Jan 2015 20:50 by Domtopia.
Please Log in or Create an account to join the conversation.
Facebook Feed
Member Statistics
- Total Users: 227
- Latest User: greenreleafdispensary
- Online Users: 2
- Users Today: 0
- Users this Week: 1
- Users this Month: 1
- Users this Year: 1
NOTE! This site uses cookies and similar technologies.
By using this website you agree to the use of cookies and related data storage as detailed in our privacy policy. Learn more
I understand
Site design Mad Hamster Studios. All content is protected under © and the property of the various contributers and not to be reproduced without permission of the creator.