

- Posts: 1551
- Thank you received: 55
The shoutbox is unavailable to non-members
Shoutbox History
Auto message: A new forum post has been submitted. You can view the message here
14 hours ago
Auto message: A new forum post has been submitted. You can view the message here
14 hours ago
Auto message: A new forum post has been submitted. You can view the message here
14 hours ago
Crankshaft's Sketchbook
- crankshaft
-
 Topic Author
- Offline
- Platinum Member
-

Less
More
18 Feb 2015 23:45 #8983
by crankshaft
Replied by crankshaft on topic Crankshaft's Sketchbook
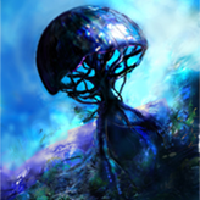
Wow! Thanks guys! Didn't expect any paint overs! I'm so lucky to have you guys around.
@Micro Nice! You are right about the contrast. The original doesn't pop like your paint over.
@Dom Loving that radio active symbol! Didn't even think of that! I'm so using that. I knew I was missing something. It's still a wip and I was about to put textures-how did you get that look on the door? Simply by overlaying photos on top?
Another question: I put a lot of effort into the line work/finer details, especially with the door/locking tumbler. I feel like the painting "hides" the technical side of it. Any ideas on how to make them pop? Or more obvious? Just put more details like textures?
Thanks guys!
Please Log in or Create an account to join the conversation.

19 Feb 2015 00:05 #8984
by Domtopia
Everything's on the right!!!
It's like driving abroad!
Replied by Domtopia on topic Crankshaft's Sketchbook
I didn't use an overlay, it was even more simple than that in the end! I found out that my copy of PSE9 comes with a bizillion shapes with the custom shape tool, so I browsed and found the radioactive sign. Then filled it with the colour I wanted, locked transparency and painted in the weathering and scratch details. Texture is very important, so spend a lot of time doing it!
If you want to keep the hard edges on your mechanical details (highly recommended on a piece like this!) then simply use the marquee tools and the polygonal lasso tool to create the shapes you want and paint within the selection. It will mask the rest of the painting, meaning you can only paint within the selection. A tip is to turn the selection "marching ants" off by pressing Ctrl+H. That will help a lot with seeing what you are doing! The process from then on is more or less the same. First, pay attention to the light sources. Second, use a hard brush (I just use standard hard round) at a high opacity and just kiss the edges with a highlight on two sides and a shadow on the other two. After that you can weather the rest of the selection.
Work from the bottom up too, it's much easier!
Hope that helps!
Everything's on the right!!!
It's like driving abroad!
Please Log in or Create an account to join the conversation.
- crankshaft
-
Topic Author
- Offline
- Platinum Member
-
Less
More
- Posts: 1551
- Thank you received: 55
19 Feb 2015 01:29 #8985
by crankshaft
Replied by crankshaft on topic Crankshaft's Sketchbook
@Dom Thanks so much for the help! I was backwards with using texture. I was going to use them last (by super imposing photos?) because I thought they were "finishing touches." So you're saying we should use textures right from the beginning? Also, which is better, photo textures or textured brushes? And what do you mean by weathering? Sorry for the noob questions:P
I honestly feel like I crawled out of a cave and learned how to walk again with this feedback..is it too late to save the painting? I felt I was doing pretty well.... Feeling overjoyed and upset
I honestly feel like I crawled out of a cave and learned how to walk again with this feedback..is it too late to save the painting? I felt I was doing pretty well.... Feeling overjoyed and upset
Please Log in or Create an account to join the conversation.
- microscopi
-
- Offline
- Premium Member
-

Less
More
- Posts: 743
- Thank you received: 79
19 Feb 2015 03:30 #8986
by microscopi
Replied by microscopi on topic Crankshaft's Sketchbook
Crank, I think photo textures are great for making realistic images and textured brushes for getting a paint feel. I think having a lot of dark/light contrasting area's really brings out lights and atmospheric effects, that's something I saw in your picture, has a dark sci fi vibe to it which is cool. Next pic you do you'll remember what you did with this pic and improve 
Please Log in or Create an account to join the conversation.
19 Feb 2015 14:23 #8987
by Domtopia
Everything's on the right!!!
It's like driving abroad!
Replied by Domtopia on topic Crankshaft's Sketchbook
It's a great painting with buckets of further potential, so don't feel upset about it Crank!! That's why not just one, but two artists on the site were sufficiently inspired to try a paintover in the first place!!
My advice about texture is to start early. There's no need to use special brushes, but they can save some time. For example, I used the hard round brush at a small size, increased the spacing and scatter in the brush dynamics window and then painted in some subtle mottles on the blue metal parts on a low opacity.
One of the most effective tips is to use the marquee or other selection tools to creates a mask and then to pick out the edges with progressively lighter highlights. Keep it subtle though! Then using a very small brush, but on quite a high opacity, pick a fairly bright grey and add a scratch or two. Adding a highlight just under the scratch will add depth and realism to it too. Give it a go!
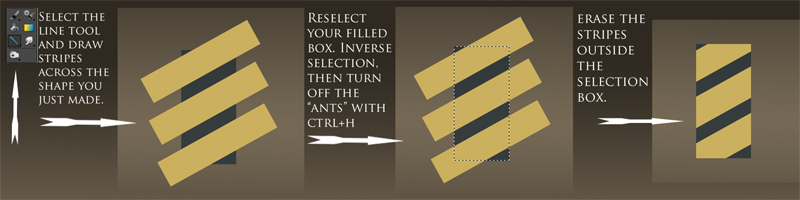
I will paint a step by step for how I painted the chevrons too, if you like. That might help to explain what I'm on about!
My advice about texture is to start early. There's no need to use special brushes, but they can save some time. For example, I used the hard round brush at a small size, increased the spacing and scatter in the brush dynamics window and then painted in some subtle mottles on the blue metal parts on a low opacity.
One of the most effective tips is to use the marquee or other selection tools to creates a mask and then to pick out the edges with progressively lighter highlights. Keep it subtle though! Then using a very small brush, but on quite a high opacity, pick a fairly bright grey and add a scratch or two. Adding a highlight just under the scratch will add depth and realism to it too. Give it a go!
I will paint a step by step for how I painted the chevrons too, if you like. That might help to explain what I'm on about!
Everything's on the right!!!
It's like driving abroad!
Please Log in or Create an account to join the conversation.
19 Feb 2015 16:31 #8988
by Domtopia
Everything's on the right!!!
It's like driving abroad!
Replied by Domtopia on topic Crankshaft's Sketchbook
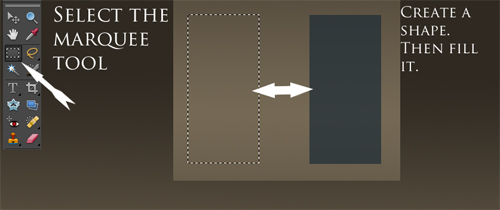
So here it is. Hopefully this will explain how to get the weathering and other effects you want.
This first step is useful regardless of what you want to make. Masking like this allows you to create shapes and to manipulate them without fear of contaminating other area of your painting, keeps things sharp and keeps things editable throughout the whole process.
Following these next steps has allowed me to create linear patterns and to manage them effectively. They are perfect for adding graphics or for creating the effect of embossed surfaces.
Lastly, I get to the fun part, weathering! Imagine it as a 3D object, like a multi-part model and that will help. I paint GW models too (as I'm a nerd) and that helped me to picture what I wanted, for example. Be messy as this adds to the weathering. Mix your colours up, make the changes subtle and remember to use a little but of shadow at the boarder of any highlights. This really makes it pop I think. Subtlety is the key here.

These steps represent my methods, they are not the only steps, but they work well enough for me. Experiment and try out whatever you think might work.
Hopefully that was helpful!!
This first step is useful regardless of what you want to make. Masking like this allows you to create shapes and to manipulate them without fear of contaminating other area of your painting, keeps things sharp and keeps things editable throughout the whole process.
Following these next steps has allowed me to create linear patterns and to manage them effectively. They are perfect for adding graphics or for creating the effect of embossed surfaces.
Lastly, I get to the fun part, weathering! Imagine it as a 3D object, like a multi-part model and that will help. I paint GW models too (as I'm a nerd) and that helped me to picture what I wanted, for example. Be messy as this adds to the weathering. Mix your colours up, make the changes subtle and remember to use a little but of shadow at the boarder of any highlights. This really makes it pop I think. Subtlety is the key here.
These steps represent my methods, they are not the only steps, but they work well enough for me. Experiment and try out whatever you think might work.
Hopefully that was helpful!!
Everything's on the right!!!
It's like driving abroad!
Please Log in or Create an account to join the conversation.
- crankshaft
-
Topic Author
- Offline
- Platinum Member
-
Less
More
- Posts: 1551
- Thank you received: 55
21 Feb 2015 03:37 #9012
by crankshaft
Replied by crankshaft on topic Crankshaft's Sketchbook
Wow Dom *thanks* a lot! *Jots down Dom's name on I.O.U list* You've demystified textures for me! I thought they were some kind of black magic and not that straightforward instead. Will post an update soon!
@Micro Thanks man! Will definitely add textures this time!
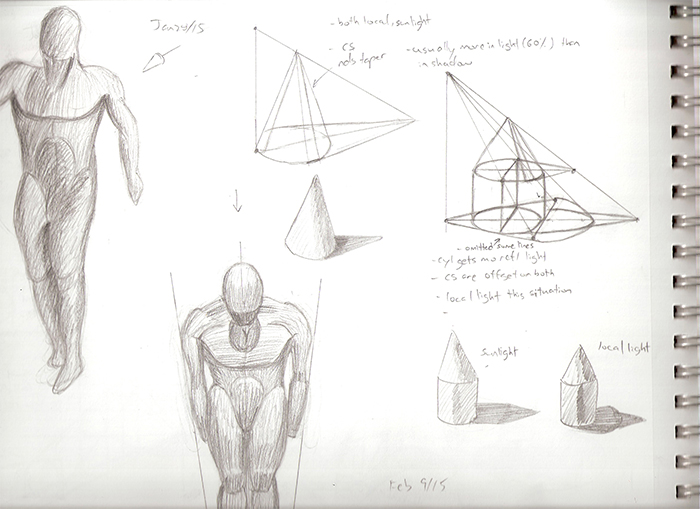
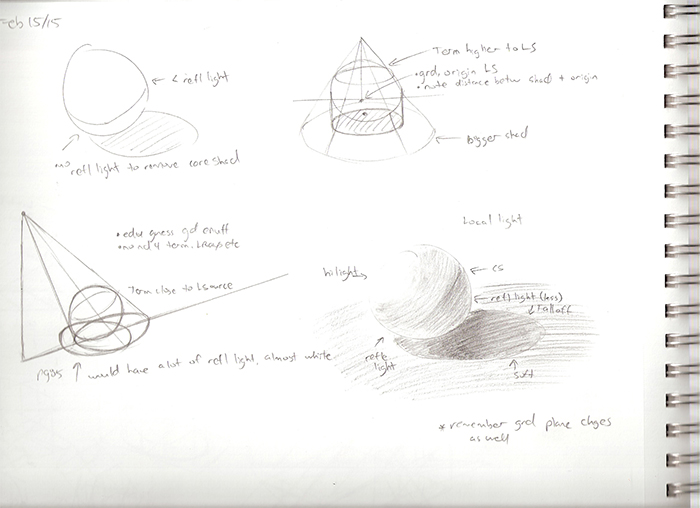
More studies! Yay!
@Micro Thanks man! Will definitely add textures this time!
More studies! Yay!
Please Log in or Create an account to join the conversation.
21 Feb 2015 15:13 #9016
by Domtopia
Everything's on the right!!!
It's like driving abroad!
Replied by Domtopia on topic Crankshaft's Sketchbook
You're welcome dude!
Nice studies. That's what a sketchbook should be full of! It would be interesting to see some digital sketchbook stuff too, if you have any. Creating 3D objects with 2D software is great practice for example. Try making spheres or cones in PS.
Nice studies. That's what a sketchbook should be full of! It would be interesting to see some digital sketchbook stuff too, if you have any. Creating 3D objects with 2D software is great practice for example. Try making spheres or cones in PS.
Everything's on the right!!!
It's like driving abroad!
Please Log in or Create an account to join the conversation.
- microscopi
-
- Offline
- Premium Member
-
Less
More
- Posts: 743
- Thank you received: 79
22 Feb 2015 15:46 - 22 Feb 2015 15:50 #9029
by microscopi
Replied by microscopi on topic Crankshaft's Sketchbook
Looking great Crank I think fundamentals are pretty important, perspective studies are a great place to improve. You seem to be busy with that right now wow, you could make your own artbook with all those pics! Great input Dom, wasn't aware of that technique either, who needs art school with you guys around 
I think fundamentals are pretty important, perspective studies are a great place to improve. You seem to be busy with that right now wow, you could make your own artbook with all those pics! Great input Dom, wasn't aware of that technique either, who needs art school with you guys around
Last edit: 22 Feb 2015 15:50 by microscopi.
Please Log in or Create an account to join the conversation.
- crankshaft
-
Topic Author
- Offline
- Platinum Member
-
Less
More
- Posts: 1551
- Thank you received: 55
22 Feb 2015 18:13 #9033
by crankshaft
Replied by crankshaft on topic Crankshaft's Sketchbook
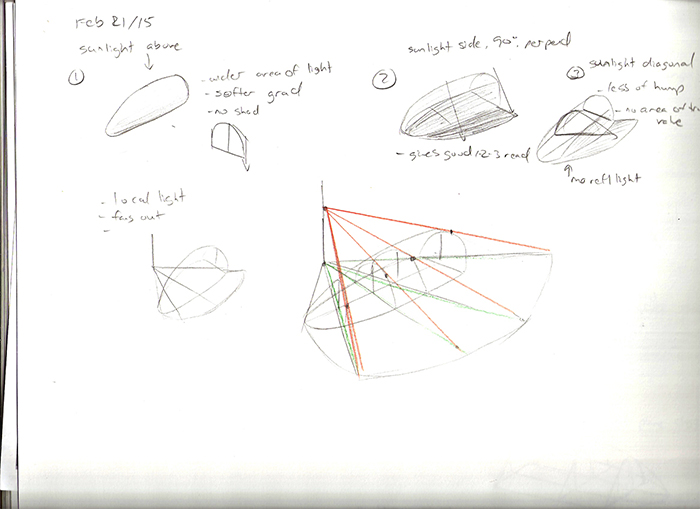
Hey guys got some more studies. Rendering round objects from different angles.
@Dom I'm anxious to do everything digitally now that I feel I have a solid grasp of some fundamentals. And thanks about my SB being full of studies! I thought people would find them boring to look at but I'm actually super proud of them!
@Micro Thanks! That would be cool idea! I do though wonder how many people would actually buy an art book full of boxes and grids
Now now that I'm getting into rendering it'll probably be much easier to do everything digitally as rendering with brushes is easier than with pencils. I've been mainly focusing on my factory and I'll update that soon!
Please Log in or Create an account to join the conversation.
Facebook Feed
Member Statistics
- Total Users: 226
- Latest User: norajohnson
- Online Users: 1
- Users Today: 0
- Users this Week: 0
- Users this Month: 0
- Users this Year: 0
Members Online
NOTE! This site uses cookies and similar technologies.
By using this website you agree to the use of cookies and related data storage as detailed in our privacy policy. Learn more
I understand
Site design Mad Hamster Studios. All content is protected under © and the property of the various contributers and not to be reproduced without permission of the creator.